https://myhappyman.tistory.com/109
Spring WebFlux - WebFlux 알아보기... index.html연동
최근 Spring에서 반응형 코딩이 가능하다는 이야기를 들었고 팀원끼리 학습을 해보기로 하여 rx.js를 통해 컨셉을 이해해보고 비동기, 동기~ 블로킹이니 단어나 개념들부터 차근차근 잡고 학습을 진행해보았습니다..
myhappyman.tistory.com
해당 글에서는 페이지에 접근할 때 Thymeleaf를 활용하여 해당 태그에 데이터를 파싱하는 예제를 확인하였습니다.
이번에는 ajax를 통해 비동기로 해당 페이지에 데이터를 파싱하는 예제를 확인해보겠습니다.
ajax를 통한 Flux데이터 파싱하기
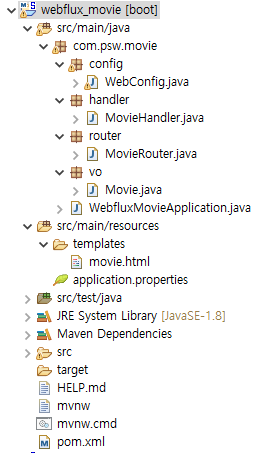
1. 먼저 스프링부트 프로젝트를 생성합니다.
생성할 구조는 아래와 같습니다.
2. 디펜던시 설정을 합니다.
<dependency>
	<groupId>org.springframework.boot</groupId>
	<artifactId>spring-boot-starter-webflux</artifactId>
</dependency>

<dependency>
	<groupId>org.springframework.boot</groupId>
	<artifactId>spring-boot-starter-thymeleaf</artifactId>
</dependency>
* webflux, thymeleaf 사용을 위해 적용
3. 프로젝트의 뷰 설정을 합니다.
WebConfig.java
package com.psw.movie.config;

import org.springframework.beans.BeansException;
import org.springframework.context.ApplicationContext;
import org.springframework.context.ApplicationContextAware;
import org.springframework.context.annotation.Bean;
import org.springframework.context.annotation.Configuration;
import org.springframework.web.reactive.config.EnableWebFlux;
import org.springframework.web.reactive.config.ViewResolverRegistry;
import org.springframework.web.reactive.config.WebFluxConfigurer;
import org.thymeleaf.spring5.ISpringWebFluxTemplateEngine;
import org.thymeleaf.spring5.SpringWebFluxTemplateEngine;
import org.thymeleaf.spring5.templateresolver.SpringResourceTemplateResolver;
import org.thymeleaf.spring5.view.reactive.ThymeleafReactiveViewResolver;
import org.thymeleaf.templatemode.TemplateMode;
import org.thymeleaf.templateresolver.ITemplateResolver;

@EnableWebFlux
@Configuration
public class WebConfig implements ApplicationContextAware, WebFluxConfigurer {

	ApplicationContext context;

	@Override
	public void setApplicationContext(ApplicationContext applicationContext) throws BeansException {
		this.context = context;
	}

	@Bean
	public ITemplateResolver thymeleafTemplateResolver() {
	    final SpringResourceTemplateResolver resolver = new SpringResourceTemplateResolver();
	    resolver.setApplicationContext(this.context);
	    resolver.setPrefix("classpath:templates/");
	    resolver.setSuffix(".html");
	    resolver.setTemplateMode(TemplateMode.HTML);
	    resolver.setCacheable(false);
	    resolver.setCheckExistence(false);
	    return resolver;
	}

	@Bean
	public ISpringWebFluxTemplateEngine thymeleafTemplateEngine() {
	    SpringWebFluxTemplateEngine templateEngine = new SpringWebFluxTemplateEngine();
	    templateEngine.setTemplateResolver(thymeleafTemplateResolver());
	    return templateEngine;
	}

	@Bean
	public ThymeleafReactiveViewResolver thymeleafReactiveViewResolver() {
	    ThymeleafReactiveViewResolver viewResolver = new ThymeleafReactiveViewResolver();
	    viewResolver.setTemplateEngine(thymeleafTemplateEngine());
	    return viewResolver;
	}

	@Override
	public void configureViewResolvers(ViewResolverRegistry registry) {
	    registry.viewResolver(thymeleafReactiveViewResolver());
	}
}
4. 요청 페이지로 핸들링 및 데이터 파싱을 도와줄 handler를 생성합니다.
MovieHandler.java
package com.psw.movie.handler;

import org.springframework.http.MediaType;
import org.springframework.stereotype.Component;
import org.springframework.web.reactive.function.server.ServerRequest;
import org.springframework.web.reactive.function.server.ServerResponse;

import com.psw.movie.vo.Movie;

import reactor.core.publisher.Flux;
import reactor.core.publisher.Mono;

@Component
public class MovieHandler {

	final static MediaType TEXT_HTML = MediaType.TEXT_HTML;
	final static MediaType APPLICATION_JSON = MediaType.APPLICATION_JSON;

	//movie.html로 변환
	public Mono<ServerResponse> movie(ServerRequest request){
		return ServerResponse.ok().contentType(TEXT_HTML).render("movie");
	}

	//요청이오면 JSON형태로 데이터 파싱
	public Mono<ServerResponse> getMovieList(ServerRequest request){
		Flux<Movie> list = Flux.just(
				new Movie("괴물", "봉준호", "2006", 13019740)
				, new Movie("아바타", "제임스 카메론", "2009", 13338863)
				, new Movie("인터스텔라", "크리스토퍼 놀란", "2014", 10309432)
				, new Movie("어벤져스: 인피티니워", "루소형제", "2018", 11212710)
				, new Movie("기생충", "봉준호", "2019", 10281306)
				);
		return ServerResponse.ok().contentType(APPLICATION_JSON).body(list, Movie.class);
	}
}
movie메소드에서는 movie.html페이지로 랜더를 해주기 때문에 MediaType.TEXT_HTML 형태로 파싱해주고
getMovieList메소드는 Flux객체에 Movie객체형태를 담아 JSON형태로 파싱을 해줄 예정입니다.
5. 요청에 따른 데이터 처리를 해줄 router를 구성합니다.
기존 mvc패턴의 controller라고 생각하시면 됩니다.
MovieRouter.java
package com.psw.movie.router;

import org.springframework.context.annotation.Bean;
import org.springframework.context.annotation.Configuration;
import org.springframework.http.MediaType;
import org.springframework.web.reactive.function.server.RequestPredicates;
import org.springframework.web.reactive.function.server.RouterFunction;
import org.springframework.web.reactive.function.server.RouterFunctions;
import org.springframework.web.reactive.function.server.ServerResponse;

import com.psw.movie.handler.MovieHandler;

@Configuration
public class MovieRouter {

	final static MediaType TEXT_HTML = MediaType.TEXT_HTML;
	final static MediaType APPLICATION_JSON = MediaType.APPLICATION_JSON;

	@Bean
	public RouterFunction<ServerResponse> index(MovieHandler movieHandler){
		return RouterFunctions.route(
				RequestPredicates.GET("/").and(RequestPredicates.accept(TEXT_HTML)), movieHandler::movie)
				.andRoute(RequestPredicates.GET("/movie").and(RequestPredicates.accept(TEXT_HTML)), movieHandler::movie);
	}

	@Bean
	public RouterFunction<ServerResponse> getMoiveList(MovieHandler movieHandler){
		return RouterFunctions.route(
					RequestPredicates
						.POST("/getMovieList")
						.and(RequestPredicates.accept(APPLICATION_JSON)),
						movieHandler::getMovieList);
	}
}
/, /moive url로 접근하게 되면 movie.html페이지로 연결해주며
getMovieList를 POST형식으로 요청을 하게 되면 handler에서 작성한 리스트 데이터가 JSON형태로 응답해줍니다.
6. Movie객체를 생성할 VO를 생성합니다.
Moive.java
package com.psw.movie.vo;

public class Movie {
	String title;
	String director;
	String since;
	int audienceCnt;

	public Movie(String title, String director, String since, int audienceCnt) {
		super();
		this.title = title;
		this.director = director;
		this.since = since;
		this.audienceCnt = audienceCnt;
	}

	public String getTitle() {
		return title;
	}
	public void setTitle(String title) {
		this.title = title;
	}
	public String getDirector() {
		return director;
	}
	public void setDirector(String director) {
		this.director = director;
	}
	public String getSince() {
		return since;
	}
	public void setSince(String since) {
		this.since = since;
	}
	public int getAudienceCnt() {
		return audienceCnt;
	}
	public void setAudienceCnt(int audienceCnt) {
		this.audienceCnt = audienceCnt;
	}
}
7. resources아래 templates디렉토리를 생성하고 뷰 페이지로 사용할 movie.html를 생성합니다.
templates/movie.html
<!DOCTYPE html>
<html>
	<head>
		<meta charset="UTF-8">
		<title>Movie</title>
		<style>
	    	*{padding:0; margin:0;}
	    	table tr th{background-color: #FFBB00;}
	    	table tr th, td{border: 1px solid black; text-align: center; width: 200px;}
	    </style>
	</head>
	<script src="https://code.jquery.com/jquery-3.4.1.js"></script>
	<body>
		<h1>WebFlux Asynchronous</h1>
		<br/><br/><br/>
		<h1>Movie List</h1>
			<table id="MovieTable">
				<tr>
					<th>제목</th>
					<th>감독</th>
					<th>연도</th>
					<th>관객수</th>
				</tr>
			</table>
	</body>
	<script>
	$(document).ready(function(){
	    init();
	});

	function init(){
		$.ajax({
			url: "/getMovieList",
			type: "POST",
			data: "",
			dataType: "JSON",
			success: function(args){
				fnSuccess(args);
			},
			error: function(args){
				alert("에러가 발생했습니다.");
			}
		});
	}

	function fnSuccess(res){
		if(res != null){
			var tag = "";
			res.forEach(function(d){
				tag += "<tr>" +
							"<td>" + d.title + "</td>" +
							"<td>" + d.director + "</td>" +
							"<td>" + d.since + "</td>" +
							"<td>" + d.audienceCnt + "</td>" +
						"</tr>";
			});

			$("#MovieTable").append(tag);
		}
	}
	</script>
</html>
8. 마무리
부트 프로젝트를 동작시키고 정상적으로 작동하는지 확인합니다.

localhost:8080 또는 localhost:8080/movie로 접근하면 페이지에 접근이 됩니다.
html페이지에서는 jquery때문에 페이지가 로드가 된 후에 ajax를 통해 POST방식의 getMoiveList으로 요청을 진행합니다. 그럼 만들어놓은 라우터로 접근이 되고 핸들러(mvc의 서비스역할)의 getMovieList의 데이터를 JSON형태로 가져옵니다.
이후는 자바스크립트 단에서 원하는 형태로 파싱을 하면 해당 페이지처럼 데이터를 확인할 수 있습니다.
'WEB > Spring' 카테고리의 다른 글
| Spring - lombok @AllArgsConstrutor 인식 에러, 동작 안함 (0) | 2020.04.08 |
|---|---|
| Spring WebFlux - 몽고 DB 연동하기 (0) | 2020.04.06 |
| Spring WebFlux - WebFlux 알아보기... index.html연동 (0) | 2020.03.23 |
| SpringBoot - 스프링부트에서 채팅프로그램(소켓통신) 만들기-5(Websocket으로 파일 전송하기) (12) | 2020.03.06 |
| SpringBoot - 스프링부트에서 채팅프로그램(소켓통신) 만들기-4(채팅방 만들기2) (14) | 2020.03.05 |