최근 Spring에서 반응형 코딩이 가능하다는 이야기를 들었고 팀원끼리 학습을 해보기로 하여 rx.js를 통해 컨셉을 이해해보고 비동기, 동기~ 블로킹이니 단어나 개념들부터 차근차근 잡고 학습을 진행해보았습니다. 여전히 개념은 잡히지 않고 단순 html파싱조차도 헤매고 있는 상황이지만 기록과 공유를 위해 일단 학습한 내용부분까지 적어보고자 합니다.
일단 가장 헷갈렸던 부분으로 Blocking, Non-Blocking / Synchronous, Asynchronous 용어였습니다.
2:2 매트릭스 형태의 그림을 가장 많이 발견 할 수 있는데, 간단하게 정리해보겠습니다.
용어정리
Blocking - Synchronous
블로킹이면서 싱크로나이즈인 경우는 일반적인 동기식 프로그램 scanf() 메소드, file.read(), jdbc연결의 select 등등이 있을것입니다.
Non-Blocking - Asynchronous
논블로킹방식이면서 비동기 방식으로 콜백을 던져주고 완료되면 콜백에게 이벤트가 끝났다고 알리는 방식으로 입력과 출력간에 기다리는 상황이 없기때문에, 자원을 효율적으로 사용할 수 있습니다. 사용 예로는 Node.js, ajax, 이번에 다뤄볼 WebFlux가 있습니다.
Non-Blocking - Synchronous
논블로킹이면서 동기식으로 폴링(Polling)방식으로 불리우며, 특정 시간마다 데이터가 준비되었는지 상태를 확인하는 방식입니다. 계속 확인을 하다가 완료가 되면 종료됩니다.
Blocking - Asynchronous
굳이 다루지 않겠습니다...
Spring MVC와 Spring Webflux의 차이
Spring MVC 패턴은 HTTP요청이 들어오면 큐를 통해 들어오는데 Thread pool이 수용할 수 있는 수의 요청까지만 동시적으로 작업이 처리되고, 그 이상의 수가 들어오면 큐에서 대기를 합니다. 즉 한개의 요청은 한개의 Thread를 사용합니다.
Thread를 생성하는 비용이 크기때문에 미리 생성해뒀다가 재사용하면서 효율적으로 사용하며, 서버의 성능에 맞게 제한이 됩니다. (톰캣은 기본 Thread가 200개) 여기서 문제는 이 Thread pool의 개수가 넘어간 경우인데, 큐에 쌓이기 시작하면 처리속도가 급격하게 느려지면서 많은 지연시간이 발생됩니다.
이러한 문제를 타파하고자 만들어진 컨셉은 Webflux이며 Event만 담당하는 적은 수의 Thread로 비동기식 처리를 하여 효율적인 프로그램을 생성합니다. 하지만 제한점이 역시 존재하는데 중간에 블로킹이 존재하면 해당 방식은 안하느니만 못하게 됩니다. core가 2개짜리인 cpu에서는 Thread가 2개가 생성되는데, 블로킹이 걸리는 작업이 존재한다면 100개의 요청이 들어온 경우 98개의 요청은 마냥 기다리고 있어야 하기 때문입니다. 일반 MVC패턴이라면 200개가 처리하므로 더 효율적일거 같네요...
아직 논블로킹 방식의 지원하는 라이브러리가 많지는 않은 상황이고 NoSql인 몽고DB나, redis가 지원중이고 RDB는 아직 사용은 안해봤지만 MS-Sql, Postgresql정도가 지원한다고 합니다.
간단 사용 예제 index.html 띄워보기
1. 먼저 boot 프로젝트부터 생성해야 합니다.

2. webflux사용을 위해 dependency 추가를 합니다.
pom.xml
<dependencies>
	<dependency>
	    <groupId>org.springframework.boot</groupId>
	    <artifactId>spring-boot-starter-webflux</artifactId>
	</dependency>

	<dependency>
		<groupId>org.springframework.boot</groupId>
		<artifactId>spring-boot-starter-thymeleaf</artifactId>
	</dependency>

	<dependency>
		<groupId>org.springframework.boot</groupId>
		<artifactId>spring-boot-starter-test</artifactId>
		<scope>test</scope>
		<exclusions>
			<exclusion>
				<groupId>org.junit.vintage</groupId>
				<artifactId>junit-vintage-engine</artifactId>
			</exclusion>
		</exclusions>
	</dependency>
</dependencies>
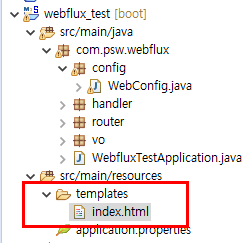
3. 생성할 구조 트리는 아래 캡처와 같습니다.
WebConfig : webflux사용을 위한 설정들을 진행할 파일입니다.
WebFluxHandler : index.html을 반환하는 hanlder를 작성합니다.
WebFluxRouter : 요청을 해당 핸들러로 라우팅하는 라우터입니다.
WebFluxVO : 데이터를 담을 객체 vo입니다.
index.html : view 처리를 할 html입니다.

4. WebFlux 및 view페이지 설정하기
WebConfig.java
package com.psw.webflux.config;

import org.springframework.beans.BeansException;
import org.springframework.context.ApplicationContext;
import org.springframework.context.ApplicationContextAware;
import org.springframework.context.annotation.Bean;
import org.springframework.context.annotation.Configuration;
import org.springframework.web.reactive.config.EnableWebFlux;
import org.springframework.web.reactive.config.ViewResolverRegistry;
import org.springframework.web.reactive.config.WebFluxConfigurer;
import org.thymeleaf.spring5.ISpringWebFluxTemplateEngine;
import org.thymeleaf.spring5.SpringWebFluxTemplateEngine;
import org.thymeleaf.spring5.templateresolver.SpringResourceTemplateResolver;
import org.thymeleaf.spring5.view.reactive.ThymeleafReactiveViewResolver;
import org.thymeleaf.templatemode.TemplateMode;
import org.thymeleaf.templateresolver.ITemplateResolver;

@EnableWebFlux
@Configuration
public class WebConfig implements ApplicationContextAware, WebFluxConfigurer {

	ApplicationContext context;

	@Override
	public void setApplicationContext(ApplicationContext applicationContext) throws BeansException {
		this.context = context;
	}

	@Bean
	public ITemplateResolver thymeleafTemplateResolver() {
	    final SpringResourceTemplateResolver resolver = new SpringResourceTemplateResolver();
	    resolver.setApplicationContext(this.context);
	    resolver.setPrefix("classpath:templates/");
	    resolver.setSuffix(".html");
	    resolver.setTemplateMode(TemplateMode.HTML);
	    resolver.setCacheable(false);
	    resolver.setCheckExistence(false);
	    return resolver;
	}

	@Bean
	public ISpringWebFluxTemplateEngine thymeleafTemplateEngine() {
	    SpringWebFluxTemplateEngine templateEngine = new SpringWebFluxTemplateEngine();
	    templateEngine.setTemplateResolver(thymeleafTemplateResolver());
	    return templateEngine;
	}

	@Bean
	public ThymeleafReactiveViewResolver thymeleafReactiveViewResolver() {
	    ThymeleafReactiveViewResolver viewResolver = new ThymeleafReactiveViewResolver();
	    viewResolver.setTemplateEngine(thymeleafTemplateEngine());
	    return viewResolver;
	}

	@Override
	public void configureViewResolvers(ViewResolverRegistry registry) {
	    registry.viewResolver(thymeleafReactiveViewResolver());
	}
}
boot프로젝트에서 WebFlux사용을 위해 @EnableWebFlux어노테이션을 설정합니다.
또한 뷰처리를 위해 Thymeleaf 설정도 bean등록을 해줍니다.(TemplateResolver, TemplateEngine, ViewResolver)
TemplateResolver에서 templates아래를 보도록 설정하였으니 resources아래에 templates디렉토리와 index.html을 생성합니다.
5. view 페이지 생성
index.html
<!DOCTYPE html>
<html>
	<head>
	    <meta charset="UTF-8"/>
	    <title>WebFlux</title>
	</head>
	<body>
		<h1>WebFlux!!!!!!!!!!!!!!!!!</h1>
		<h3>
			<p>name : <b th:text="${data.name}"> </b></p>
			<p>age : <b th:text="${data.age}"> </b></p>
		</h3>
	</body>
</html>
6. 데이터를 담을 VO를 작성합니다.
package com.psw.webflux.vo;

public class WebFluxVO {
	String name;
	int age;

	public String getName() {
		return name;
	}
	public void setName(String name) {
		this.name = name;
	}
	public int getAge() {
		return age;
	}
	public void setAge(int age) {
		this.age = age;
	}

	public WebFluxVO(String name, int age) {
		this.name = name;
		this.age = age;
	}
}
7. index.html을 반환하는 handler를 작성합니다.
WebFluxHandler.java
package com.psw.webflux.handler;

import java.util.HashMap;
import java.util.Map;

import org.springframework.http.MediaType;
import org.springframework.stereotype.Component;
import org.springframework.web.reactive.function.server.ServerRequest;
import org.springframework.web.reactive.function.server.ServerResponse;

import com.psw.webflux.vo.WebFluxVO;

import reactor.core.publisher.Mono;

@Component
public class WebFluxHandler {
	public Mono<ServerResponse> index(ServerRequest request){
		final Map<String, WebFluxVO> data = new HashMap<>();
		data.put("data", new WebFluxVO("", 0));
		return ServerResponse.ok().contentType(MediaType.TEXT_HTML).render("index", data);
	}

	public Mono<ServerResponse> hello(ServerRequest request){
		final Map<String, WebFluxVO> data = new HashMap<>();
		data.put("data", new WebFluxVO("psw", 32));
		return ServerResponse.ok().contentType(MediaType.TEXT_HTML).render("index", data);
	}
}
return타입을 보면 Mono라는 클래스형이면서 ServerResponse를 상속받는 객체만 처리하도록 되어 있습니다.
여기서는 단순하게 Mono는 0~1개의 단일 데이터, Flux는 0~다중 데이터로 알고 넘어 가면 될 것 같습니다.
8. 작성한 handler를 요청에 따라 연결해줄 router를 작성합니다.
WebFluxRouter.java
package com.psw.webflux.router;

import org.springframework.context.annotation.Bean;
import org.springframework.context.annotation.Configuration;
import org.springframework.http.MediaType;
import org.springframework.web.reactive.function.server.RequestPredicates;
import org.springframework.web.reactive.function.server.RouterFunction;
import org.springframework.web.reactive.function.server.RouterFunctions;
import org.springframework.web.reactive.function.server.ServerResponse;

import com.psw.webflux.handler.WebFluxHandler;


@Configuration
public class WebFluxRouter {
	@Bean
	public RouterFunction<ServerResponse> index1(WebFluxHandler webFluxHandler){
		return RouterFunctions.route(RequestPredicates.GET("/")
				.and(RequestPredicates.accept(MediaType.TEXT_HTML)),
				webFluxHandler::index);
	}

	@Bean
	public RouterFunction<ServerResponse> index2(WebFluxHandler webFluxHandler){
		return RouterFunctions.route(RequestPredicates.GET("/index")
				.and(RequestPredicates.accept(MediaType.TEXT_HTML)),
				webFluxHandler::index);
	}

	@Bean
	public RouterFunction<ServerResponse> hello(WebFluxHandler webFluxHandler){
		return RouterFunctions.route(RequestPredicates.GET("/hello")
				.and(RequestPredicates.accept(MediaType.TEXT_HTML)),
				webFluxHandler::hello);
	}
}
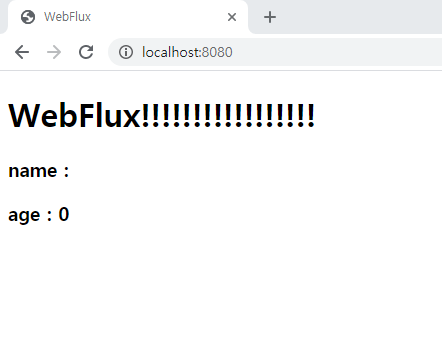
9. 작성이 완료되면 Spring boot App을 구동합니다.
localhost:8080으로 접근하면 아래처럼 페이지를 확인할 수 있습니다.
router에서 hello인 경우에도 매핑처리를 하였는데, 이번엔 hello주소까지 접근해보겠습니다.
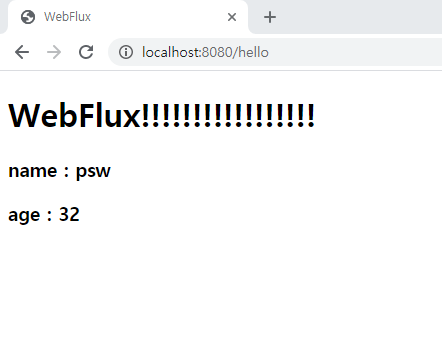
map객체에서 name, age값이 파싱되어 출력되는걸 볼 수 있습니다.
참조 사이트 :
https://phrase.com/blog/posts/a-step-by-step-guide-to-i18n-in-spring-webflux/
https://alwayspr.tistory.com/44
https://homoefficio.github.io/2017/02/19/Blocking-NonBlocking-Synchronous-Asynchronous/
https://docs.spring.io/spring/docs/5.0.0.M5/spring-framework-reference/html/web-reactive.html
'WEB > Spring' 카테고리의 다른 글
| Spring WebFlux - 몽고 DB 연동하기 (0) | 2020.04.06 |
|---|---|
| Spring WebFlux - ajax(비동기)를 통한 데이터 파싱 예제 (0) | 2020.03.25 |
| SpringBoot - 스프링부트에서 채팅프로그램(소켓통신) 만들기-5(Websocket으로 파일 전송하기) (12) | 2020.03.06 |
| SpringBoot - 스프링부트에서 채팅프로그램(소켓통신) 만들기-4(채팅방 만들기2) (14) | 2020.03.05 |
| SpringBoot - 스프링부트에서 채팅프로그램(소켓통신) 만들기-3(채팅방 만들기1) (13) | 2020.03.05 |