반응형
Table 태그를 구성하다보면 데이터가 길어질 경우를 대비해서 스크롤을 내리더라도 헤더컬럼부분을 고정으로 주고
아래 데이터부분만 스크롤이 되도록 처리하는 경우가 있습니다.
"<table>" 태그를 "<thead>"와 "<tbody>" 형태로 구성하시고 "<thead> <th>"에는 position: sticky를 처리하면 고정형 테이블을 구성할 수 있습니다.
다만, sticky의 경우 IE에서 지원이 안되기때문에 static으로 동작하여 일반적인 테이블처럼 동작하게 됩니다.
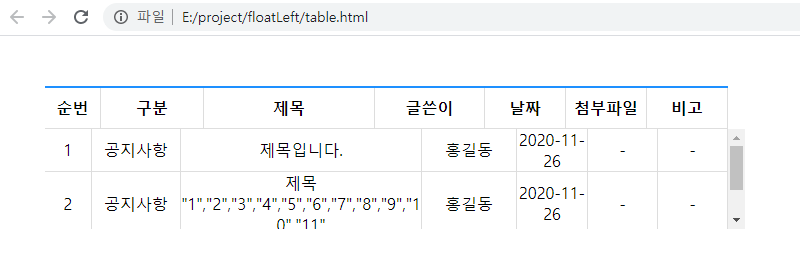
아래는 sticky를 사용하여 고정헤더 테이블 샘플 예제 소스입니다.
헤더 고정하기
<!DOCTYPE html>
<html lang="en">
<head>
<meta charset="UTF-8">
<meta name="viewport" content="width=device-width, initial-scale=1.0">
<title>Table</title>
<style>
*{margin:0; padding:0;}
html, body, .wrapper{width:100%; height: 100vh;}
.wrapper .tableBox{position: relative; top: 50px; left: 50px; width: 700px; height: 100px; overflow-y: scroll; border-top: 2px solid dodgerblue;}
.tableData{width: 100%; border-collapse: collapse; text-align: center;}
.tableData thead tr th{position: sticky; top: 0; background: #ebeaea;}
.tableData thead tr th,
.tableData tbody tr td{padding: 15px 0; box-sizing: border-box; border-bottom: 1px solid #dedede; border-right: 1px solid #ddd; word-break: break-all;}
</style>
</head>
<body>
<div class="wrapper">
<div class="tableBox">
<table class="tableData">
<colgroup>
<col width="8%">
<col width="15%">
<col width="25%">
<col width="16%">
<col width="12%">
<col width="12%">
<col width="12%">
</colgroup>
<thead>
<tr>
<th class="stiky">순번</th>
<th class="stiky">구분</th>
<th class="stiky">제목</th>
<th class="stiky">글쓴이</th>
<th class="stiky">날짜</th>
<th class="stiky">첨부파일</th>
<th class="stiky">비고</th>
</tr>
</thead>
<tbody>
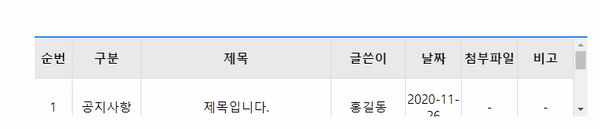
<tr>
<td>1</td>
<td>공지사항</td>
<td>제목입니다.</td>
<td>홍길동</td>
<td>2020-11-26</td>
<td>-</td>
<td>-</td>
</tr>
<tr>
<td>2</td>
<td>공지사항</td>
<td>제목 "1","2","3","4","5","6","7","8","9","10","11"</td>
<td>홍길동</td>
<td>2020-11-26</td>
<td>-</td>
<td>-</td>
</tr>
<tr>
<td>3</td>
<td>게시판</td>
<td>123456789123456789123456789</td>
<td>홍길동</td>
<td>2020-11-26</td>
<td>-</td>
<td>-</td>
</tr>
</tbody>
</table>
</div>
</div>
</body>
</html>thead 태그의 th들에게 position:sticky를 처리하여 고정시킨 예제입니다.
주의점으로 thead나 thead tr에 sticky를 줘도 동작하지 않기에 꼭 thead영역의 th들에게 sticky처리를 하셔야 합니다.
HTML - Table td안에 특수문자(")가 존재할 경우 넓이 초과 현상
DB데이터를 가져와서 테이블에 데이터를 만들어 append를 처리하고 있었는데, 데이터 문자열 내부에 "(더블 쿼드)가 포함된 긴 문자열이 들어가 있었고, 정상적인 넓이로 table이 동작하지 않았다. '
myhappyman.tistory.com
이전 글인 table을 두개로 넓이를 동일하게 처리하여 구성한 테이블에서 발생할 수 있는 현상도 방지할 수 있고, 깔끔하게 동작이 됩니다!
IE를 신경쓰지 않아도 되는 프로젝트에서는 유용하게 사용할 수 있겠습니다.
반응형
'WEB > HTML,CSS' 카테고리의 다른 글
| HTML - id속성에 관하여...(css적용, javascript 사용 ) (0) | 2022.05.18 |
|---|---|
| HTML - Input태그에서 엔터 키입력시 submit 동작 현상 막기(form태그 내부 input태그 키입력) (0) | 2021.09.13 |
| HTML - Table td안에 특수문자(")가 존재할 경우 넓이 초과 현상 (0) | 2020.11.26 |
| CSS - p태그 등 너무 긴 문자열이 존재할 때, 넓이에 따른 자동 줄바꿈 (2) | 2020.09.09 |
| CSS - position:absolute 가운데, 중앙 정렬하기 (4) | 2020.08.14 |