반응형
https://myhappyman.tistory.com/86
Spring - 파일 다운로드 예제 - IE, Chrome (스프링 파일 다운로드 구성)
스프링 프로젝트에서 파일 업로드와 다운로드를 하는 방법을 알아보겠습니다. 이번 포스팅에선 다운로드 예제를 작성했습니다. 추가 메이븐 다운로드 없이 스프링 설정만 하시면 됩니다. 파일 다운로드 web.xml
myhappyman.tistory.com
이전 포스팅 스프링에서 파일 다운로드 받기에 이어 업로드 예제를 진행해보겠습니다.
다운로드는 위 URL의 포스팅을 참고해주세요.
파일 다운로드
servlet-context.xml
<!--  spring-upload -->
<beans:bean id="multipartResolver" class="org.springframework.web.multipart.support.StandardServletMultipartResolver" />
<!-- spring-upload -->multipartResolver를 bean등록하여 추가합니다.
web.xml
파일 전송시 서블릿에서 10메가로 파일제한 처리하였습니다.
<!-- Processes application requests -->
<servlet>
	<servlet-name>appServlet</servlet-name>
	<servlet-class>org.springframework.web.servlet.DispatcherServlet</servlet-class>
	<init-param>
		<param-name>contextConfigLocation</param-name>
		<param-value>/WEB-INF/spring/servlet-context.xml</param-value>
	</init-param>
	<load-on-startup>1</load-on-startup>
	<!-- fileupload multipart-config maxSize set -->
	<multipart-config>
        <max-file-size>104857600</max-file-size> <!-- 10MB limit -->
        <max-request-size>104857600</max-request-size>
        <file-size-threshold>0</file-size-threshold>
    </multipart-config>
    <!-- fileupload multipart-config -->
</servlet>
commonController.java
upload요청이 올 경우 처리할 컨트롤러를 추가합니다.
(common/upload매핑)
import java.io.File;
import java.io.IOException;
import java.util.HashMap;
import org.springframework.stereotype.Controller;
import org.springframework.ui.Model;
import org.springframework.web.bind.annotation.RequestMapping;
import org.springframework.web.bind.annotation.RequestParam;
import org.springframework.web.multipart.MultipartFile;
import org.springframework.web.servlet.ModelAndView;
@Controller
@RequestMapping("/common")
public class CommonController{
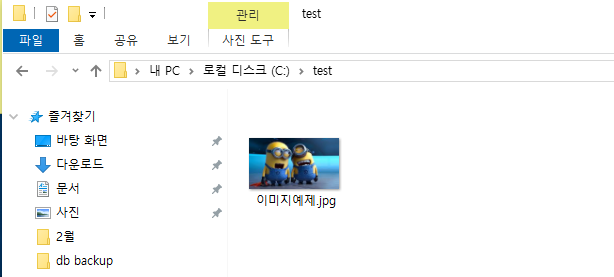
private static final String FILE_SERVER_PATH = "C:/test";
@RequestMapping("/upload")
public String upload(@RequestParam("uploadFile") MultipartFile file, ModelAndView mv, Model model) throws IllegalStateException, IOException {
if(!file.getOriginalFilename().isEmpty()) {
file.transferTo(new File(FILE_SERVER_PATH, file.getOriginalFilename()));
model.addAttribute("msg", "File uploaded successfully.");
}else {
model.addAttribute("msg", "Please select a valid mediaFile..");
}
return "board/board";
}
}uploadFile로 요청이 파라미터 값을 확인하고 지정한 경로로 저장합니다.
(C:/test)
board.jsp
<%@page import="java.net.URLEncoder"%>
<%@ page language="java" contentType="text/html; charset=UTF-8"
    pageEncoding="UTF-8"%>

<!DOCTYPE html>
<html>
  <head>
	<meta http-equiv="Content-Type" content="text/html; charset=utf-8" />
	<meta name="description" content="">
	<meta name="viewport" content="width=device-width, initial-scale=1, maximum-scale=1">
    <title>파일 다운로드</title>
  </head>
  <body>
  	<div class="content">
		<br/><br/>
		<h3>파일 업로드</h3>
		<form action="/common/upload.do" method="post" enctype="multipart/form-data">
		  <table>
		    <tr>
		      <td>Select File</td>
		      <td><input type="file" name="uploadFile" /></td>
		      <td>
		        <button type="submit">Upload</button>
		      </td>
		    </tr>
		  </table>
		</form>
	</div>
  </body>
</html>
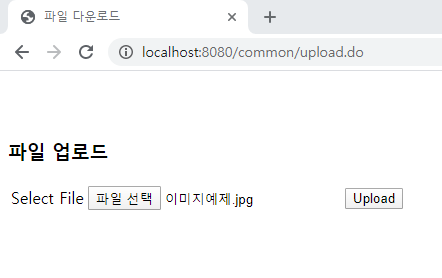
ui를 작성합니다.
파일을 선택하고 submit버튼을 누르면 action 값에 의해 만들어 놓은 컨트롤러로 전달이 됩니다.
동작 결과
반응형
'WEB > Spring' 카테고리의 다른 글
| SpringBoot - 스프링부트에서 채팅프로그램(소켓통신) 만들기-2(상대방과 자신을 구분하기) (11) | 2020.03.05 |
|---|---|
| SpringBoot - 스프링부트에서 채팅프로그램(소켓통신) 만들기-1(단순 채팅, 메시지 보내기) (62) | 2020.03.05 |
| Spring - 파일 다운로드 예제 - IE, Chrome (스프링 파일 다운로드 구성) (4) | 2020.02.19 |
| Spring - tiles 적용 에러 발생 'org.springframework.web.servlet.view.tiles3.TilesConfigurer' not found (2) | 2020.02.13 |
| Spring - 타일즈(Tiles) 적용하기 (0) | 2020.02.13 |